In anticipation of hot sun and abundant rain Laura and I have decided some sort of awning to offer protection from sun and rain would be really nice. The Landy we rented in South Africa (see separate January 2011 post “Testing the Idea in South Africa”) did not have one and when it rained we were limited to sitting and eating in the small area covered by the fold-out roof-top tent that came a few feet off the side of the roof, if the tent was open. Better to have something that runs the length of the side, perhaps in combination with the tent.
Like all our outfitting needs, the challenge in Ghana is where do we get it from? There is no shortage of manufactured RV/4×4 awnings in the market, but not in the market in Ghana. We knew we were taking a shopping trip to South Africa to buy outfitting gear (see separate March 2012 post “A Shopping Spree Like no Other” www.overlandrover-westafrica.net/?m=201203) and there are a great number of manufactured options available, including a couple from Eezi-Awn, the South African manufacturer that makes the rooftop tent that we are buying. The problem with these is that outfitters tend to be bulky and heavy, do we really want another 20 kilos hanging off one side of the roof? We also need to make choices to keep shipping, and purchase, costs down. The manufactured awnings are all rather expensive, seem to start about CAD 500 and go up from there.
I have a better idea. Instead of going for one of the manufactured awnings I have designed one to fit our roof rack and am getting Paani the welder, who has now done more work on the Landy than any other single person with the possible exception of Opere the mechanic, to put it together. It was Paani who rebuilt the doors and the original body work and a number of things around the body.
My awning design is based on the existing roof rack, which is built of metal 1″ square. The carrier rests on 12 of these 1″ square vertical “posts” that sit in the gutter that runs long the side of the roof above the windows. I encouraged Paani to use the same 1″ square metal to design and build two flat right-angle triangles 6″ high x 5′ long. The catalogue of Lee Valley Tools in Ottawa Canada was the source for quality stainless steel 1″ piano hinge used to fasten these two triangles to two of the upright posts in the roof rack, 6′ apart. The triangles swing out from the carrier to right angles with the Landy and are held apart with a 6′ long bar, also created by Paani, mounted on the ends to form a square. A piece of canvas fitted with grommets then stretches over nipples on the top of the frame to make a tight, sloping 5’x6′ awning. To collapse it, the canvas comes off and goes in a bag and the triangle supports fold in flat against the roof rack. The end bar slips into long space beside the drawers on the cargo bay floor and the bag with the canvas gets thrown anywhere in the back. That is the basic design, there are a couple of subtle refinements that make it work. There is a 1″ thick piece added to one of the uprights so that the triangles fastened to it can hinge so it folds flat over the other triangle to close. A piece of velcro wraps around the triangles to keeps them tight against the side of the roof rack. If I may say so myself, it is a brilliant design, unfortunately there is not enough market to make it worth going into production.
6″ high triangle designed by Paani provide all the support requiredPaani with his finished product, complete with canvas bought in SA and tailored by Laura. The canvas comes down over the triangle but is folded up here to illustrate the structure.
The final cost turned out to be less than CAD 350, including Paani’s great work ($200), material for metal triangles and fittings($70), the canvas and tailor ($60), the grommets ($10) even the hinges ($10). This compares very well to the cost of any of the manufactured options. The small Eezi-Awn option lists on-line at $700, which of course does include the shipping to get it to Ghana. Another important point of comparison is the weight. The advertised weight of the small Eezi-Awn awning is 30 lbs (14 kgs), all the pieces of ours add up to 19 lbs (9kg). And best of all, and perhaps somewhat surprisingly, it works very well. Using the grommets it fits snugly over the frame and there is no perceptible sag. It takes longer to set up and take down than a retractable awning but it is still pretty easy, and there are no moving parts to fail.
There were 4′ of the Lee Valley piano hinges left from the 6′ piece I bought, I left this with Paani so he can build, and sell, a couple more in response to the interest expressed by other Landy owners who have seen ours when they are visiting the shop.
The “dashboard ” of older Defenders between the drivers panel and the passenger door is notable for its very basic design. It is very much function over form, and the function is pretty basic. There is no “glove-box”, just a 4′ wide, open area with a 2″ high lip along the bottom edge to keep anything from falling out onto the floor. There are two large “ventilator control” levers used to raise the two 2′ x 4″ metal covers than run outside between the windshield and bonnet. There is a a simple switch panel in the lower central section of the dash that almost seems like an afterthought to hold the cigarette lighter and the switch for the rear windshield washer. As to where one puts a radio I was left guessing. Our vehicle must have had a radio and other electrical accoutrements at some point, the motley collection of wires that protrude from a hold in the bottom of the dash attest to that. Some of these wires go to speakers to the sides of the roof panel above the front seats, others go to the an elaborate electrical box mounted in the rear fender to house an external AC plug-in and outlets for accessories. The speakers were still installed, but were very worn out and we removed and discarded them when we redid the roof panel. All the wires are still in place.
Original dash, with basic oval panel for rear wiper switch and accessory plug visible. Note ventilator levers and vents under the upper dash
Our ideas for upgrading the dash range from creating and installing attractive hardwood “glove-box” doors that would hinge from the flat bottom lip of the dash to close under the top dash. This would add some visual ascetic appeal as it would conceal the open area. The downside is that these cover the vents that are designed to allow air to flow in (or, as James May of Top Gear jibed “just in case it isn’t noisy enough inside already”), but this is not such a concern when we have air conditioning. I have even purchased some mail-order hinges from a cabinetry shop in Canada (Lee Valley) that may work for the this, finding the hardwood here that is thin enough is proving to be more of a challenge.
However none of this addresses the problem of how to mount a radio. This vehicle must have had a radio, the wires are still there, as are two now-defunct 6 1/2 inch speakers mounted in the ceiling panels above the front doors on either side, but there is no evidence of where the radio might have been mounted. There are no holes that suggest there might have been a radio housing screwed in somewhere. However, none of this addresses the problem of how to mount a radio/CD player. No holes remain visible in any part of the dash that suggest screws were once mounted there.
We opted to get a console from MUDSTUFF, www.mudstuff.co.uk/index.shtml , a company in England that produces a range of aftermarket accessories designed for Land Rovers. The console is simply a plastic form that comes with a metal mounting frame and installation instructions. The user can choose whether they want to use the console to mount switches, meters, a radio, and the precise location of each. I ordered the console, a radio mount, an additional plug-in for AC power and some switches for lights and other accessories.
Installation was not terribly difficult, although it took longer than it would have if I had access to the tools I have storaed in Canada. I did bring a set of basic hand tools with me, which I have supplemented with a ratchet set that I purchased here. I am getting good use of all these, but I do not have any power tools. I had brought a set of light Black and Decker battery-operated tools, but the charger is not working here and it is only possible to get very light work done before the batteries expire. To install the console it is necessary to remove a section of the dash that requires cutting through a foot long section of metal. Getting the tool to do this proved to be the most difficult and time-consuming part of the project.
Original switch panel removed and dash marked for cut-out
I asked around to see who might have an electric hacksaw and ended up dealing with James, who is a contractor to the property management team at the High Commission where I work. James came by and quickly determined that a hacksaw was not going to do the job and we went off together last Saturday morning to a metal shop that had a “grinder”. This is a fairly heavy duty rotary tool that can be mounted with a range of different 4″ blades. It was noisy, messy job that took about 20 minutes and GHC 15 ($10), with another GHC 20 for James as fixer, a role which in addition to getting me to the grinder included some other drilling work in the console panel itself that he did with his own electric drill.
Dash cut out and console mounting frame installed. Note the A/C unit has been temporarily removed
At this point there is a bit of a sick feeling because all you have is a big gash in the dash and the panel that held the lighter and rear windshield washer switch is gone. From there is was more satisfying. The metal mounting plates for the console screwed into the area between the vent levers without difficulty. The vehicle has a plastic trim piece that runs along the top of the bottom front lip of the dash catch area that has to be cut. I had to stop in the middle of the installation to go up to Opere’s to borrow a simple hacksaw blade to cut the trim because I don’t have one of those either. It took five minutes to do the cutting but almost an hour to get there and back. I really miss my tools.
The biggest challenge was adapting the console and the air conditioning unit. Distribution of A/C in a Defender, at least in ours, consists of a 2-3″ high channel that screws snugly along the flat bottom of the dash. The MUDSTUFF console has a wide plastic flange e that is designed to slip between the A/C unit and the dash, which helps to establish a firm footing for the console. Unfortunately, I had recently had my A/C unit remounted complete with a screw right in the area where the flange has to go, which prevented the console base piece from slipping in. The amount of time I had to spend unmounting and remounting the A/C unit before I realized all I really had to do was cut the flange was incredible.
Console front with cut-out marks for switches and radio; original wiper switch and 12V accessory have been installed.
Cutting the holes in the console required some precision, and again the lack of tools was a pain. I could mark out the places for the radio, the switch plates, and the AC power converters (cigarette lighters), but cutting them out was more difficult. I was able to coax enough power from my B&D battery operated drill to cut round holes in the corners of the square holes for the radio and switch plates, but had to get James cut the lines to complete the job. With that I was able to mount everything into the console and install it. It is only a temporary placement of course , we don’t have speakers yet for the radio, or light to hook onto the switches yet, but the unit can be easily removed with three screws to get at the backs of the switches and the radio casing to complete the hook-ups.
Finished Product Installed with Radio and Switches
We still have to run the wires to the unit for radio and switches, but I am waiting for the lights from SA Africa (separate post coming on “a shopping trip like no other”) and we are still in the market for speakers, that one is getting to the top of the priority list .
Other project ideas for the interior front include the replacement of the vinyl-trimmed top of the cubby box between the front seats with a more attractive hardwood panel, and doors fro the dash from the same material. Then there are a whole list of things to do to make the cargo bay expedition ready. One of my biggest problems now is limited time. There is only so much you can do on weekends, I need to stop working long hours in the office, and using my vast stores of accumulated leave to devote to the Landy project.
Finished console with radio and switches for front running and rear area lights. Set up to accommodate two additional switches if required.
Now that the restoration stage is pretty much complete we have to get serious about adding the things that will make our Defender usable for overland travel. This involves planning for and procuring a whole range of systems (see separate Feb. 2012 post “Planning the Outfitting Stage”) Unfortunately, there is really nothing at all one can get in Ghana for this, nor do any of our internet suppliers include much expedition gear in their offerings. We decided that the best way to deal with this is to go ourselves to South Africa to buy stuff Our trip to South Africa included the My Land Rover has a Soul Festival (see separate post “Woodstock for Landy Lovers”) and a side trip to Victoria Falls, as well as a few days exploring the amazing Blyde River Canyon in northeastern South Africa. But the real purpose was shopping.
South Africa is arguably the best source for expedition outfitting gear in the world. There are many manufacturers and many more distributors. We had seen some of this during our first visit to South Africa in 2010 (see Jan. 2011 post on Testing the Idea in South Africa) and were able to make a list of things we might want to pick up on a return visit. We made that return visit in late February equipped with a list of about twenty items we needed and another list of a half dozen stores/suppliers to look at. The latter ranged from big box camping stores like Outdoor Warehouse to excellent 4×4 outfitting specialist stores like Front Runner 4×4 or Safari Centre, as well as suppliers of specialized items like solar power systems or awning canvas suppliers. All the photos in this post are stock photos from the suppliers, our own stuff is still on a boat somewhere en route to Ghana.
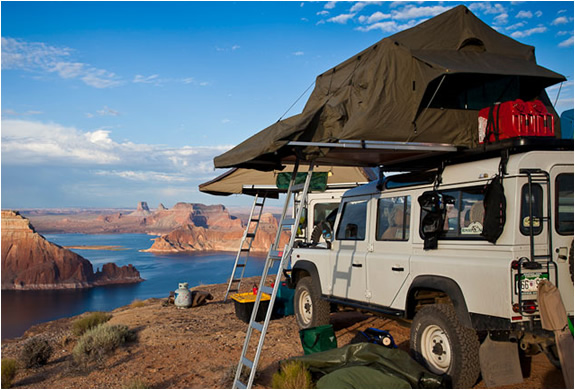
Rooftop Tent: Our experience renting an outfitted Defender introduced us to the concept of a hard floor canvas tent that bolts to a rooftop carrier. (see Jan. 4, 2011 post, Testing the Idea) The roof rack that came with our Defender will accommodate this very nicely. There are a few tent products available from different places, ranging from South Africa, Italy, Australia, etc. This is the largest, (heaviest) and most costly piece we need so we invested a fair bit of time looking at the available options. After doing lots of research we settled on the Eezi-Awn Jazz tent, a first-class quality and tested product of South Africa. Weighing in at 55 kilos there is nothing like this really. Erects quickly and easily via a ladder that comes out from underneath the floor and fills our need quite nicely. This is what we had for our earlier test run in South Africa trip and we loved it. Now we own one.
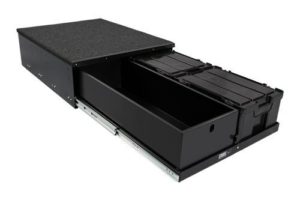
Storage Drawer System. As we learned from our earlier rental, the design of the Defender cargo bay supports the installation of a flat floor between the wheel wells in the cargo bay which creates a 1′ high x2′ wide x 4 ‘ deep space and lends itself well to installing drawers that then open out the back when the cargo bay door is open. Frontrunner 4×4 www.frontrunner.co.za in Johannesburg produces a great drawer system using simple and affordable “ammo” boxes.
In the Defender we rented from Bushlore it was this system that they used to carry all the kitchen gear and some other miscellaneous pieces. We liked it so much we went back to Frontrunner and bought one. There are other makers of 4×4 drawers but we did not see anything that was as cost-effective. I was very surprised to see a review of drawer systems carried in the Winter 2012 issue of Overland Magazine did not even seem to acknowledge the existence of this South African product. This is likely because of the American base of that magazine, but I think they missed the best product.
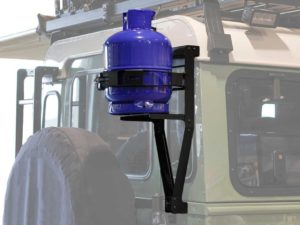
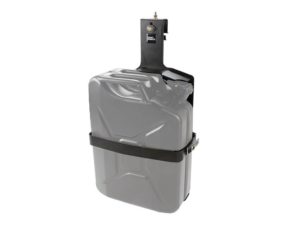
Propane and Water Storage. One can buy jerry cans in Ghana but they are very expensive and they do not come with harnesses to mount them. We looked at various floor and wheel well fuel and water storage systems that Frontrunner or others make for Defender but decided these were more that we needed or could organize for and opted instead to pick up stock water and propane tank carriers designed to fit on the side and rear exterior walls of a Land Rover Defender.
Propane Tank Rack from Front Runner
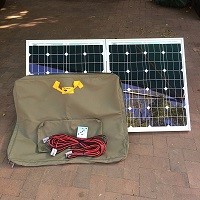
Solar Power System: After some on-line research we decided that back up power to help ease the draw on the vehicle battery when parked is a worthwhile investment. Like so much to do with overlanding there is enough demand for this in South Africa to support a couple of specialist suppliers. The one we visited was Bushpower http://www.bushpower.co.za run out of the garage of a suburban house in Kyalami on the northern reaches of Johannesburg, only about two kilometres from the Frontrunner store and factory. The panels and related wires and switches are all imported, mostly from Europe. We purchased an 85 watt panel with mounting and cables, together with a dual battery monitoring system.
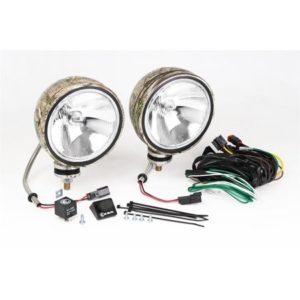
Lights: The front headlights on our Defender are not the brightest I have seen and our comfort driving at night will be greatly facilitated by additional lights. It is quite common for 4x4s to be equipped with an extra set on the bumper or roof rack. I had been looking at 70 watt Lightforce from Australia but the only place I saw them they were very expensive relative to other quality options. We opted for a product called KC, which I believe is an American company based in Arizona. These were recommended by the Safari Centre store in Centurion which carries a range of very high quality 4×4 products.
Because it gets dark at 6:00 PM here we also need to have an area light for meal prep and eating at night. We happened to notice one type in particular on the backs of three Land Rovers in parking lots our first couple of days in Jo’burg and when we saw exactly the same light in Frontrunner we figured it must be good so we picked it up.
Canvas for Awning: There are a number of roll-up awnings available in the market, including a range manufactured by Eezi-Awn tent producer. There is value in having something to provide protection from the sun and rain, but the manufactured awnings all seem expensive and require quite a bulky, heavy case that mounts permanently to the side of the vehicle. I came up with our own awning design (see separate Awning Made to Measure post for details) for which we needed some material. We thought of this when we saw a store that sells awnings for windows and decks and went in to have a look. As it turned out they did not sell material itself, but the helpful woman in the store referred us to a place called Home Hyper City near Pretoria, where she said we should see Uncle Joe. The store was the largest fabric store we have ever seen two floors the size of a football field, really incredible. We found Uncle Joe and explained what we were looking for to which he replied “oh, for your baakie?” A baakie is the term South Africans use to refer to what North-Americans know as pick-up trucks, but the term can also be used to refer to any 4×4. He led us to a row where they had a range of weights and colours of canvas and we picked up a couple of metres of canvas in two colours that will look good together and complement our own “baakie” quite nicely.
Miscellaneous: We bought a few things that were not on our list to supplement the miscellaneous items we had purchase in December 2010. A funnel, speaker wire, fastening straps, an ammo box for the roof with a water proof cover to hold sundry items like souvenirs purchased along the way, silicone spray for the awning, etc. When the shipment finally arrives in Accra we will no doubt be pleasantly surprised by things we have forgotten we purchased. It will be like Christmas, hopefully it won’t take that long to get the stuff!
By the time we were done we were glad we had bought the fridge and other outfitting gear the first time we came to South Africa from Ghana because after 3 days of nothing but shopping we had run out of time and had to go back to Ghana. The purchase of all these items came in the last few intense days of our time in Johannesburg, after our trip to Victoria Falls and the Blyde River Canyon. The most difficult part was arranging shipping. We had started the process weeks before we left Ghana through a company that brings things in to Ghana from South Africa and this led to a recommendation to rent partial space in a container to be sent by sea as an inexpensive option. It was indeed a very affordable option, unfortunately the Jo-burg forwarder we had been referred to turned out to be non-responsive and we had to go back to the original contact to try to get their attention and this led to referral to another forwarder. They turned out to be much more responsive, but it all took awhile to arrange and it not until our last couple of days in Jo-burg we had settled with them. We had to impose upon the Safari Centre 4×4 store in Centurion (between Johannesburg and Pretoria) where we bought the tent, second battery, lights and other accessories to hold all our things, not just what we bought there, but everything from all the suppliers, until the forwarder could come by to get it. They agreed to do so, and we delivered all our other sundry items to them the day before we left,on the understanding that the forwarder (Synergy) would retrieve it in the next couple of days. It actually took Synergy more than two weeks to get around to picking the stuff up, which also meant they missed the sailing of the boat they had initially said we could use. Thanks very much to the Centurion Safari Centre for helping us out in a jam.
Who ever heard of such a thing as a Land Rover Festival? But there it was, featured on the sheet on the counters or walls of the various overland outfitting shops we visited in the first couple of days in our recent trip to Johannesburg in South Africa. Apparently, part of the idea of the festival was to try to break the Guinness World Record for the greatest number of Land Rovers in a single convoy. An added incentive for us to attend there were a large number of suppliers offering on-site sales, including a “boot sale” which is the British/South African/I’m not sure where else equivalent of a flea market.
As shopping for items for the outfitting stage of our own Land Rover project was the main reason for our trip to South Africa, the opportunity to hang out with other Land Rover owners in what is arguably the world centre for Land Rover overlanding is not something easily passed up. Despite the attraction, the fact the so-called festival was taking place during the time we had booked for a 3 day trip to Victoria Falls between Zambia and Zimbabwe, one of Africa’s premiere destinations presented no small dilemma. Victoria Falls is a place that I have wanted to get to for a long time and we had decided to priorize our time for Vic Falls in what may be our last trip to South Africa before our Ghana posting ends this summer. The solution we chose to resolve the dilemma was to split the difference. Delay the trip to Victoria Falls by one day to catch the first day of the two day Landy festival (missing the Guinness record shot convoy) but still be able to spend two nights at beautiful Victoria Falls.
Our shot of Victoria Falls from the Zimbabwean side
The timing actually worked out very well. Laura decided to hold to the original schedule and go to Victoria Falls on Saturday morning and I was able to reschedule my flight by one day and take Laura to the airport in Jo’burg in our rented Volvo at 8:00 AM on my way out to Vaal, the rural district south of Jo-burg where the festival was scheduled to take place. It is worth mentioning the Volvo because it was, without any doubt, the only one present at the Land Rover Festival.
As usual, getting there was half the fun. I had obtained directions on-line how to get to the Malojeni Guest Farm, which was the site of the festival, from the Oliver Tambo Airport in Jo’burg. Unfortunately I learned too late that for some reason my Blackberry could not download the full directions file so I had instructions about two thirds of the way. I ended up in the middle of a very pleasant Vaal town called Meyerton. After unsuccessfully trying to get directions from a service station I was able to close the distance simply by following a Land Rover I saw driving by. It was while en route at this point that the Woodstock analogy first occurred to me. The line “going down to Yasgur’s farm” from the CSN song popped into my head at a small country junction where three Landys coming from three different directions converged and all headed up the same road. Clearly, I was headed in the right direction.
Registration Line at 11:00 AM on Saturday
The South African love of Land Rovers is such a phenomenon because of a couple of factors. The South African Armed Forces was/is a big user of Landy’s, and thus a source of slightly used “surplus” product for the population at large over a number of years. Another factor in all of this is the South Africans’, specifically the Afrikaaners’, love of overlanding. This is one of the features of Afrikaan’s culture that we have really come to appreciate through our visits here and the knowledge of history that comes with that. One of the defining moments of the Afrikaaner’s history was the “voortrek”, the overland journey taken by the Dutch settlers in the 1840’s to get away from the Brits that were encroaching in the more accessible areas around Cape Town where the Dutch had first settled a couple of generations earlier. The Afrikaaners are a fiercely independent people and extremely proud of their heritage. The “voortrek” became an fundamental part of Afrikaaner history and culture and by carrying through on their love of adventure and exploration of remote areas the Afrikaaners played a huge role in defining the African overland experience through pioneering trips into the some of the more remote areas of southern Africa, including Botswana, Mozambique, Namibia, Zimbabwe, Zambia and points beyond. The vehicle of choice for most of this overlanding has been the Land Rover Defender. It is really an incredible cultural phenomenon, one that has led to the proliferation of a huge number of overland outfitters and suppliers in the country, not limited to Land Rovers of course but certainly favouring them.
This title of the festival was “My Land Rover Has a Soul”, (MYLRHAS’ is the acronym). This illustrates the passion that South African Land Rover owners have for their vehicles and that passion was very evident at the festival. There were hundreds and hundreds of vehicles there on Saturday, every model ever made well represented, Series, Defenders, Discoveries and big 130s, all boasting their own particular style and personality. Some were very stock, others very customized and colourful. But it is not really so much the vehicle, the Land Rover has just perchance become a modern day expression of the Afrikaaner`s love of overland travel. Afrikaans was the first language at the MYLRHAS festival, and the festival was really less about the specifics of Land Rover mechanical or body design than it was about overland equipment outfitting: tents, awnings, cooking equipment, storage, water systems etc. all things which the very functional Land Rover design is conducive to. There was even an expedition wine carrier.
Other elements of South African/Afrikaans culture were well represented at the festival. Virtually all the food came off from the “braai”, the ubiquitous SA barbecue. Indeed the air was so thick with charcoal smoke, whether from a couple of communal braais or the many individual ones at the various campsites, that it was sometimes difficult to breath. South Africans are crazy about braais, for boerwurst sausage, or burgers or steak. They are also crazy about beer. Canadians also love their beer, but here virtually everyone was walking about visiting the shops and displays at 11:00 o’clock in the morning with a beer in their hand. This is not a culture I have any difficulty adapting to.
South Africans love their Beer and Braai
M&M’s product line includes leather “expedition wine cases” for your Pinotage
There were hundreds of vehicles and thousands of people, plenty of families with kids. In addition to the food and expositions there were helicopter rides, and an air show. No flying Land Rovers, rather some old, loud, single engine planes that were unspectacular but steady, like Land Rovers would be if they had wings. I sat down with my boerwoerst and beer lunch to listen to the live singer/guitarist musician whose repertoire included Van Morrison, Simon and Garfunkel, Sting, and, incredibly, Led Zeppelin. All good music for the white, baby-boomer audience in attendance, But after he was done with the boomer stuff the musician switched to Afrikaaner folk songs and the response was enthusiastic, to to say the least. I was treated to a real Afrikann`s culture moment, complete with beer and braai and songs about independence and overland travel. If there were any blacks there I did not see them, this seems to be exclusively a white South African, Afrikaans cultural phenomenon.
In addition to the cultural experience, I was able to benefit from the collection of overland outfitters and suppliers. In addition to a better knowledge of the market I came away with a floor-mounting safe for our vehicle, as well as a lovely Land Rover cap that I have always wanted but never came across.
I did miss the Guiness Record shot. The convoy apparently had 1007 Land Rovers of various vintages and models, ranging from Series from the 50s and 60s to just-off-the-line Discovery 5s and the new euro-styled Range Rover Evoque. The line stretched for 24 kilometres between first and last Landy. Apparently they are waiting to hear from Guiness if they have the record, but I can’t imagine anyone every getting more than 1,000 Land Rovers in a convoy before. There are some videos on youtube…….
I would have loved to have been able to stick around to overnight and to participate in the Sunday convoy, but my rented Volvo would hardly have fit in, so heading back to Jo`burg to catch the Sunday morning flight to Victoria Falls was easy to do.
With the soundproofing in we could then do the ceiling and the floor covering. For the latter we had decided even before we bought the vehicle that we wanted carpet on the floor, as opposed to the vinyl stuff that is used in many of the Landy restorations here. I can hear the off roaders groaning, I know carpet is not the first choice for the floor if you are going to be crossing rivers or doing any amount of real off roading. For that the bare metal floor is probably best. However, most of our travel will be on roads so we can afford to opt for the comfort and quiet that carpet is conducive to.
Paani had taken out the roof liners last fall to patch a couple of the holes left by superfluous electrical plugs we removed last year and the ceiling has been bare metal ever since. I had asked Paani one Saturday who did ceilings and he gave me the number of one Agomah, who keeps a shop near the Tesano area of Accra, not too far a drive from where we live. I called Agomah when I got back from seeing Paani one Saturday afternoon. Thanks to accent and vocabulary differences, telephone conversations between foreigners and Ghanaians are never easy affairs, particularly so if you have not met yet. Explaining who I was and what I wanted, and then getting into the logistical details of meeting was not easy and when we hung up I was really not sure we were on the same planet. We reviewed different options of times during the week when he might come to my house to meet me and see the vehicle. It is very common here for mechanics to make house calls, they are very quick to offer to come to your house. I love it but it sometimes can be awkward, maybe they often want to come when I am at work, or it is difficult for them to find where I live. Wanting to simplify this I suggested we meet in an obvious location known to both of us, at a time when traffic was light. This led to a rendez-vous at 8AM Sunday at Kwame Nkruman Circle, which in addition to being probably the most well known junction in Accra, is also midway between where I live and where Agomah’s shop apparently is.
Agomah's Shop - there is even a tree
I called him at 7:30AM Sunday to confirm we were still on for 8:00 and to alleviate my fear that maybe we had completely misunderstood each other the day before. When I called Agomah said “but you said 8:00 o’clock” and I had to reassure him I was not looking for him yet, just wanting to confirm where and when we were meeting. I piled the old beat up roof liners into the back and headed off to Kwame Nkrumah Circle. The roof liner consists of three solid pieces of very firm but softish board that are about 1/4 inch think and covered with a fabric material. The problem in our Defender was the covering fabric was very dirty and discoloured and had become mostly detached from the board so it just drooped loosely.
Agomah and a colleague showed up at the right time in the right place in a tro tro and after looking at the Defender suggested we go up to his shop in North Industrial a short distance away to see materials. The shop is just another ramshackle shed, one of a number along a exitramp from a main Achimota Road leading into the North Industrial district. He had some samples of other recovered ceiling panels for me to look at that were quite lovely, and with some choices of colour. I settled on a very plain but bright gray, seeking to accent the dark gray dash and interior door panels.
Agomah not only had quality roof liner, but seeing that our Defender floor still only has soundproofing on it he was
Landy at Agomah's
quick to pull out some ready cut carpeting pieces he had on hand for someone else, in a colour that matches our seats and door panels very nicely. The carpet is a short pile with a woven substrate and a smooth nonporous plastic backer. The set consists of 8 or 9 pieces that fit the front and back seat floor, over the transmission tunnel and around the seat boxes. When I said we did not want carpet in the cargo bay because it would not be functional and be too hard to clean Agoma came out with a heavy backed vinyl that he said they use quite often. Indeed it is probably the same vinyl that we had seen in the front of the Defenders and Opere restores and which was part of the inspiration to do our own restoration. As much as we may not have wanted it for the front, it looked just right for back.
Anticipating a moment like this I had brought with me for my own reference a quote I had received on ceiling and carpeting work from someone else a few months earlier. We got into price and I countered his original quote of GHC 500 (CAD 300) for ceiling and carpets with an offer of $450 (CAD 270). We shook hands on it and I gave him GHC 100 down, all the money I had in my pocket at the time. That was probably the most spontaneous of any decision I have had made on this project, and one of the best. The price was much lower that the other I had got earlier, from Michael who had done the back seat for me, and Agomah was recommended by Paani, who did my body work w (SEE SEPARATE POST) and that recommendation counted for a lot. We are very pleased with the result.
The best part was I did not even have to leave the vehicle with them, they just took my old ceiling panels to recover, the carpets they can produce based on their knowledge of Defenders, and if there were any doubt there were 3 or 4 Defender 110s I saw hanging about they could use for measurements.
It was sometime before I could get back to Agomah to have him install the roof liner and carpet, and I think he was wondering why after a couple of weeks I still had not returned. I was hesitating anyway because I wanted to run wires to the back for an outside area light and for speakers and thought I should do that before the carpet and ceiling went in. The problem was I was having trouble finding quality wire. With the lapsed time I was feeling guilty because I had given them such a small deposit and Laura and I were about to head for South Africa on two week holiday/outfitting gear shopping trip. Before we went away I went by and gave Agomah another 200 cedis, leaving a 150 cedi balance. I also picked the new liners and carpet up and brought everything home, having seen the “shop” I was a bit nervous that it could get dirty, rained on or otherwise damaged.
Finally on a Saturday in mid-March after we got back from our shopping trip to South Africa I was able to back to Agomah with the Defender and the ceiling and carpet pieces I had been safeguarding so he could finish the installation. It did not take very long, although I did have to ferry back to the house in a taxi to pick up a can of odds and ends that Paani had given me six months ago after he stripped the interior to do take the electrical plugs out of the roof and upgrade the doors that included, inter alia, the plastic plugs that are needed to put the roof liner in. Very pleased with the end product, they even put the mirror and sun visors back in and installed the interior ceiling lights front and back. Amazingly, the lights worked right away. The roof liner actually surpassed my expectations, the old ceiling was so loose that I thought I was going to get a new, clean fabric hanging loose, but instead I get a new, clean fabric fully moulded to the panel. It looks superb.
Roof Liner Install Finishing TouchesSlightly re-juvenated Sun Visors going in
The carpets also went in, as well as the vinyl floor covering for the cargo bay. There were a few minor trims Agomah and his helper had to do but it all went in quite nicely. There are a couple of things that I am not entirely satisfied with, for example for some reason they did not carpet a 4 inch vertical piece between the back seat and the cargo bay that is quite visible. The roof liner panel also needs to be tightened up around the sunlights on the side of the roof. I had already gotten them to fix a couple of other bits, like making sure there was enough clearance between the accelerator pedal and the carpet so I was running out of time so I paid them the 150 cedis holdback with a 40 cedi dash and they said come back anytime and they would put the missing carpet piece in. My experience with Ghanaian tradespeople is that once you have established a business relationship and as long as you don’t squeeze them too much on price they are more than willing to do follow-up fixes. I am also going to ask them to recover the sun visors, which they had offered to do initially but which I declined thinking we had cleaned the old visors up so nicely they did not need to be recovered. However, once installed they don’t look quite so nice against the new ceiling. Those are details that will be get looked after, but it all looks very nice now. Also worthy of comment is the further noise reduction. After driving around in a bare metal box for six months the addition of soundproofing, roof-lining and carpets makes a remarkable difference.
The new ceiling liner and the vinyl covered cargo bay. Interior rear window surrounds are also in. The 3/4 split back seat is out to test the space for the mobile fridge.
I just had a very productive weekend. I took the Defender up to the Land Rover farm on Saturday for Panni to put the door panels and fittings back in. Some of that I could have done myself but it would have taken me a lot longer. He also put the wheel arches back on. As a final touch, he fitted the one remaining step that I was not able to do myself because I was missing the steel stabilizing bar that runs from the step to the chassis.
Jonathon and Paani confer while the last step goes in
He said the cost was included in the original price I paid for the body work, which makes a certain amount of sense, but for his trouble I dashed him 10 cedis ( about $6.50) for his two hours work, which he seemed to appreciate greatly. I was very impressed that he had all the pieces that he had removed when he did the orginal body work last summer,all the door liners, the inside mirror, the window surrounds and the buttons to put them back on. He even came up with a plastic surround for the rear window wiper/washer which I had forgotten I had. Much of this I had purchased months ago and completely forgotten about, but he had kept it safe. Panni and I were also able to discuss two other projects that would benefit from his skills, a fold away table to stow under the roof-tup carrier and an awning to be attached to the carrier, but these are really part of the expedition outfitting that is the next phase of the project. I am going to do a separate post on those under expedition outfitting
I was expecting to see Eric the electrician at the shop on Saturday but he was not there. I had phoned him Friday to confirm he was going to be there. Then when I was about to leave home the Defender would not start. I inspected the battery terminal, which is perennially loose and up till now if the vehicle did not start playing with it solved the problem. This time it did not. However, I noticed that the terminal was sparking when I engaged the ignition, which suggests there was a short somewhere. I thought through the various possibilities and wondered if the problem might be in one of the loose wires that are hanging in various places waiting to be rewired to interior lights, or the stereo, or to one or another accessory that may have been in at one point in the vehicles history. I started with a bundle of wires that is on the dash that I had moved around when I was cleaning the dash a few days earlier and sure enough that was the problem. I re-taped all the loose wires protruding from the dash and the battery stopped sparking and the Defender started right away. I called Eric and harangued him for leaving the wires in such a sloppy state. He said he was on the way to the shop would be there by the time I arrived.
Eric never showed up, but I was approached by his “helper”, who went around and taped up any wires that were obviously at risk. I also had him run the wire for the front and rear ceiling lights so it would be easy to get to those after the roof liner was back in. And I had him replace the battery terminal that did not fit the post properly. No more loose connection. I feel dumb for not having it fixed earlier, but there were so many other higher priorities I just never focused on it. Of course this would have been done right away months ago by a competent electrician with a service mentality. I recall Brian, my colleague who had done a Defender the year I arrived, saying he had had some trouble with electrics at Opere’s shop. And all I have had done so far is very, very basic. In the next stage we need to instal a dual battery system, numerous accessories and switches to support them. I just don’t see these guys being able to handle that.
I am somewhat sorry I left the pieces with Paani because I could have been cleaning them. This is something I prefer to do myself because it does ot require any particular skill and I can see the limits of the process. Everything is really dirty but dirt does not explain all the visual defects.
Washing the Rear Window SurroundClened Interior Door Panels ready for re-install
Some of the pieces are in good shape, others are worn beyond what any cleaning can hope to restore. I can’t install all the interior window surrounds until the roof liner is redone and that is the next priority.
This is the first post in the Expedition/Outfitting category of the West African Wander blog, one year after we first purchased the vehicle. That delayed post is terribly misleading, in fact we started thinking about outfitting very early, and even purchased a National Luna 52 litre fridge in late 2010 before we even bought the Land Rover to put it in. Since then the focus has definitely been on restoring the basic vehicle (see post on a Look Back at the Year), but we have made a number of purchases that fall into the outfitting category. This post is going to provide a brief picture of where we want to get to.
The idea for the six-week trip is to spend much of the time camping, interspersed with hotel stays. That means we need to outfit the Defender to sleep, cook, eat , wash and various other sundry activities. Laura and I very much enjoy the outdoors and have done lots (I mean lots!) of camping, including car and canoe camping in Canada and backpacking in Costa Rica. However our overland vehicle experience is limited to the week we rented an outfitted Defender from Bushlore in Johannesburg in 2010 and took it up the Sani pass into Lesotho (see separate post TESTING THE IDEA). We had also rented a small motorhome van with our daughter Katherine to do a trip through the Alberta foothills years ago on the way to our niece’s wedding in Waterton Lakes National Park. Not exactly off road or as immediately relevant to a Defender, but it still provided some exposure to independent vehicle camping.
Essentially our approach is to think in terms of systems, a preliminary list of which could include:
Electrical: We will install a dual battery system where the first battery is devoted to keeping the motor running and a second serves to power camping accessories when the motor is not running, such as a fridge, lights, sound system, computer, etc. Solar power back-up will also be useful.
Cooking/eating: In South Africa we carried two propane tanks with fitting burners. We need to find out what fuel supply is most available in the area we are covering and design a system to fit that. Cooking and eating utensils also fall into this system, as do a table and perhaps a shade/rain awning.
Sleeping: Basically, a tent to protect from the elements. We really liked the roof-top tent we used in South Africa/Lesotho and just need to figure out how to get one into Ghana.
Water: We need water for washing and potable water for drinking and cooking. Options for either include storage tanks installed in the wheel wells or the back seat interior floor or jerry cans mounted on the side or the roof. Safe weight distribution, specifically the need not to put too much weight on the roof, is one of the considerations that favours the storage tank system. Water sources will be limited and for drinking water we may need to rely on buying commercial bottles and just store those. Some way of purifying water, and cleaning fruit and vegetables, will also be necessary.
Lighting: This close to the equator it gets dark at 18:00 every night so having sufficient exterior light to be able to use and enjoy evenings is very important. I would also like to have additional driving lights as a backup in case of system failure or in the event of sandstorms. And extra driving lights on a 4×4 look so cool…..
Recovery: This is the term the 4×4 off-roaders use to refer to getting unstuck. It is probably not worth investing in a winch because we are not planning or expecting to do much off-roading, but a tow-rope, whether for our benefit or for others, is probably a good idea, as would be jumper cables. This category could also include a tire pump and sand ladders of some sort.
Maintenance: This is about the tools that are required to address the most likely problems that might arise.
Storage: All the systems mentioned above imply some need for storage, indeed water and fuel systems are essentially storage systems. However, we need to think about accessible storage for all the kitchen gear, food, clothes, tools and accessories. The refrigerator is an important component of storage.
In addition to these these “systems”, there will no doubt be other things that will come up as we learn more about “overlanding”. From now on most posts will be in the outfitting category.
It has now been a year since we took delivery of the an old Land Rover Defender in very poor condition with the intention of nursing it back to sound mechanical health and outfitting it for a trip somewhere in West Africa. It is a good time for a review, which in effect is a summary of the blog posts over the past year.
At purchaseThe original motor did smoke quite badlyLack of a working alternator required a push start to get to Opere’s shop for the first round of mechanical upgrades
Mechanical: While it was sold as a “drivable vehicle”, the Defender we bought in February 2011 hardly met that criterion. The alternator was gone and the battery very low so it did not really start. The motor smoked badly and much of the running gear – clutch, brakes, wheel bearings, etc. , were badly in need of renewal. By June, within 3 months or so of purchase, we had replaced the TDI300 motor, all hoses, all the clutch and brake pieces, wheel bearings, track rod ends, front differential and front propshaft. The motor was a bit of a high stakes gamble, but it is one that so far seems to have paid off, because it is running so well and there are no leaks and I have not noticed any oil consumption. The first phase of the mechanical work also included installation of new heavy duty Biltstein shock absorbers all around and replacement of the original rubber bushes (the pieces that go between the chassis and all the suspension and axles) with high quality polybushes. As a result the ride is smooth and confident. The Defender seems to be able to perform in all the gear settings, high and low and two and four wheel drive, although we have yet to take it on any off-road tracks. Little things that did not work before, like the fuel gauge and hand brake, now work. Even the clock works.
Bodywork: The body was essentially sound, but with plenty of dings and dents in the aluminum body and rust at the base of the doors, a common affliction with Land Rovers where the aluminum body comes into contact with the steel door frame and water can be present. Particularly severely rusted were the foot wells, the drivers side right through to daylight. By September, within 6 months or so, the body had been completely restored, including installation of new foot wells and repair of any dents in the skin. The doors had been rehung with new hinge screws and any rusted door frames replaced. The bonnet latch which did not work now does, complete with a new functioning security cable from the interior. The broken rear “safari” door frame has been repaired. The windows that rattled no longer rattle. The door steps have been completely reconstructed. The front bumper has been straightened. The front grille has been (broken by someone at Opere’s and) repaired. The Defender has been completely cleaned inside and out, and rust removed from underneath. It has been repainted, and it is beautiful. We purchased and installed a new Defender decal for the front of the bonnet. Remaining bodywork includes the installation of the chequerplate aluminum panels on the fenders and bonnet and insertion of the new locks on the front and rear doors, and new Tdi 300 decals.
The fender the elephant (must have) sat onThats more like it
Air Conditioning: Within seven months the old air conditioning system that did not work had been replaced with an old air conditioning system that does work, sort of. This aspect does not inspire confidence and we may yet soon find we have to take advantage of those cute uber-functional vents that open an close in the bulkhead below the windscreen to keep us cool when the air conditioning system fails. I am rather sure it will, you get what you pay for and we did not pay very much.
Electrical: Within eight months the basic electrics mostly worked (lights, horn, wipers), and the contract is signed and parts procured for new lighting inside and out. Like the air conditioning the quality of the electrical work is a bit dubious and will require some careful monitoring to have Phase Two of the electrical completed properly, which includes the installation of a dual battery system and various accessories like the fridge (purchased in South Africa more than a year ago), fog and rear area lights.
Interior: The interior was worn and dirty, with the front seats on their second cover, consisting of old flour bags. Something which we did not really notice until now is the condition of the ceiling roof lining, which was taken out and stored at Opere’s Land Rover farm when the body work was being done. 15 years of road dirt and seasonal harmatan dust had left the light grey lining a dark shade of brown that spews dirt on slapping.
At purchaseStripped Down for Painting
By December, within 10 months, the interior had been ompletely stripped, cleaned and repainted.
Putting in the visco-elastic, butyl-based sound deadener from Alberta. Our own mobile tar sandsNew seats installed in cleaned, painted, soundproofed Defender,Laura installing thermo-acoustic foam sound absorber on the bonnetLets be honest about who’s done all the work.So much recovering, so little coverThat more like it
The vehicle has been soundproofed throughout, with material brought in from Canada.
The front seats have new foams and covers from Exmoor Trim, the front seats slide back and forth and the backs adjust. The back seats have new foam and covers locally done and the cargo area seats have been removed to make space for expedition gear storage.
We have also purchased other important bits and pieces, like the door locks, although those have yet to be installed. Removal of all the interior decor and seats is an achievement that is also worth noting – it took a lot of time and painstaking work, much of it done ourselves. do Having stripped it down not only allowed for a good clean paint job inside, it also made the interior soundproofing and carpeting easier. Just this week we have taken the final step in the restoration stage with signature of a contract to redo that dirty and ugly roof liner and install carpet in the front and back seats, with vinyl in the rear. With that the restoration/upgrading will be complete to our satisfaction.
One minor disappointment on the interior was the failure to find a used Discovery I back seat to replace the Defender bench-like back seat in order to acheive greater comfort for passengers. As an alternative I am going to try to customize the old Defender seat a few inches further back and lower down to gain leg and head-room, but I am not sure this is worth it. We are outfitting this vehicle for expedition and do not expect to carry passengers for very long once we hit the road. The best arrangement might be to to retain the 1/3 portion of the back seat split and devote the rest to expedition gear and storage.
Our daughter Kat wanted to take it for a spin when she visited from University at Christmas, but had a hard time depressing the clutch
In terms of cost for all this, there is no question we spent more than what Opere wanted for a 1995 Defender 110 he had redone himself. However, there are some important improvements that justify the additional cost:
The fact that the vehicle needed so much work means that more of the vehicle has probably been renewed than if I had purchased another that had been done by Opere.
With a couple of important exceptions (A/C and motor) the parts in our restoration are all new, and most are genuine Land Rover or Original Equipment Manufacturer. We know exactly where they came from.
The material and workmanship of the interior finish and upholstery is of much greater quality than what is done here.
Our cost includes soundproofing, which does not appear to be done here at all.
We have a very good roof rack and ladder, which will be a tremendous boon to organize for expedition.
Preparation for and implementation of the painting is of a high quality, and the paint job is two tone, and includes the wheels and roof rack and ladder.
It is also worth mentioning that one of the objectives of the DIY approach was to be able to become acquainted with the vehicle. I am still far from being a Landy expert, and there are whole systems that I do not really have a first-hand knowledge of, but I have been able to gain a great deal of familiarity with this vehicle, far more than I ever would have been able to had I purchased it rebuilt.
Last and not least, over the past year managing the restoration ourselves has been a fabulous window on Ghana, offering an access to the day-to-day culture that we would not otherwise have had. I have met a whole bunch of everyday Ghanaians and been able to gain new understanding of how they think and work. I made many new friends.
There is no question I underestimated the amount of work this vehicle needed. I negotiated hard for the vehicle but I did not negotiate as hard as I should have, I think I took a sense of false confidence from Opere who referred me to the vendor Gomez. The EPA Defender had been driven hard, maintained poorly and stripped of many parts before it was sold. I knew it would be necessary to replace the engine and running gear like the clutch and brakes, but I did not expect to have to replace the front differential, or to be annoyed by the absence of small but very important things like the fuel sender unit, or the parking brake shoes (which Opere felt so ripped off about he actually “dashed” the parts to me). However, we probably now own the best 15 year old Defender in the country, and we are not finished yet. We have definitely raised the bar for Opere and his crew, this Defender seems to get the envious attention of everyone coming in to the shop with their own, which pretty much all pale in comparison.
It is now reasonable to say that the restoration portion of the project is pretty much complete. The focus now has to shift to all the extras required for expediton outfitting. We started that with our trip to South Africa in December 2010 before we owned the Defender, and came back with a fridge, stover burners and a bunch of other things.We now have to shift to the outfitting stage. There are things we have purchased and not yet installed (ie. fridge, chequerplate aluminum panels, dual battery isolator, camp gear) and lots more we have yet to purchase (roof top tent, camp table, awning, mobile storage system, water storage system, sound system, etc.) but most of that falls outside the scope of the restoration phas.e. Expedition outfitting will easily add between CAD 3,ooo and CAD 4,000 to the cost, and most of it will have to be (or already has been) imported.
We are going to have to pick up the pace to be able to be expedition- ready in six months. The internal storage system still has to be designed and installed, including potable water system. We will need a rooftop tent and awning. a camp table. a cookstove, and various other accessories. We have started to accumulate the gear, including the fridge we bought in South Africa last year. One more holiday in South Africa would certainly come in handy, there are literally dozens of supply places there, and not a single one here.
The task which I should have mentioned first is to obtain legal registration and insurance. All the shuttling back and forth between shops and more recently, just running errands, have been done quite illegally. I was stopped by a policemen recently, who told me to do up my seat belt, which I did, I did not have the heart to tell him the ends were just hanging off the sides of the seats without being bolted to anything. The seat belts are now reinstalled, the lights all work, and I have all the papers to be able to register it. Top priority now is to go to the Vehicle Licensing Authority to make it legal. Can’t wait to get those red DP plates on it. There is a backstory to that, but it warrants a separate post.
With all the body work and painting of the past six months most of the interior and exterior fittings were removed and put aside, either on our terrasse or carport or in the shed at Opere’s. I have become quite accustomed to driving around in a vehicle with no door panels, mirrors, or window winders, that is so empty and hollow it rattles and bangs and echos. The past month or so has seen tremendous progress restoring the interior finish. I had not been in a rush to put it back together, until Opere told me that the Department of Vehicle Licensing will not pass it if the interior is not finished, or if the rubber wheel arches are not on. One might argue the logic of some of that, or wonder how the tro-tros driving around Accra with doors hanging by rope managed to pass, but I don’t mind the additional incentive.
The work needed just to get the inside finished,never mind kitted out for expedition, will involve a series of steps: soundproofing, electrical, carpet, ceiling liner, and reinstallation of all the door panels and interior trim. The soundproofing had to be done first, and fortunately we were very ready for that, having obtained the material sometime ago from B-Quiet in Lethbridge, Alberta. (See Separate Post: SOUND REDUCTION PUZZLE) Laura and I did the installation ourselves, starting with a layer of “Ultimate” the thin butyl-based sound deadener throughout, on the inside of all the doors, the floor, and the roof. It is not difficult to work with once you get the hang of cutting it with a box cutter. The two challenges are to make sure it is set where you want it because it is almost impossible to move once it is on, and to avoid getting the rather gooey butyl rubber stuck where it is not supposed to be stuck. I had to use some acetone more than once to get it off surfaces where it did not belong, including on the outside paint.
Once the Ultimate was in on the floor we added a layer of B-Quient’s V-Comp foam and high density rubber composite sound absorber. This stuff is heavy, more than a pound per sq ft. and we did not have very much of it, just enough for the front floor through the footwells and over the transmission, the tops of the seat boxes, and the back floor. But every little bit helps.
I was able to use some of the rubber flip flop material I bought from Ghana Rubber Products on some floor areas and inside the seat boxes, but there is lots lof that eft over.
Installing B-Quiet “ultimate” sound deadenerCargo Bay Finished with the “ultimate” sound deadner
We then we covered the underbonnet with their Hiliner heat resistant foam. This is much lighter than either the Ultimate or the V-Comp, which means we can still lift the bonnet!
Laura putting the Highliner into the bonnetUnder the Bonnet with insultated foam Hiliner from B-QuietCab floor with “Ultimate” deadener with V-comp foam and rubber going in on floor and transmission tunnel.“Ultimate” Deadener on floor, seatboxes and doors
The sound “proofing” adds about 75 pounds to our running weight, but it is definitely worth the weight, and the CAD 300 cost. The noise reduction is quite remarkable and the whole vehicle feels more solid and finished. That will no doubt improve further once we get the interior door panels and roof liner back in, and get carpet on the floor.
All 4x4s have plenty of ground clearance, in our case there is 18″ between the bottom of the front door and the ground. That makes for a fairly large step up to get into the vehicle, so it helps to have some sort of interim step to facilitate access and egress. Often this consists of steel runners, sometimes called “raider bars”. In older Defenders like ours this function is served by actual folding steps that are mounted to the frame below each door.
In our Defender the steps were original, but three of the five in very poor condition. On one the plate is so rusted the plate has begun to corrode away and a couple of others are badly twistted, like someone went off-roading without folding them up and they impacted with a piece of particularly unforgiving terrain. The rubber mats that sit on top of the steps with the cool Land Rover emblem are completely gone from two of the steps. Just two of the steps are in reasonably good condition, ironically the best one is the driver’s step. Either the driver did not use the step, as crew clambering in and out, or that one wore out first and was replaced at some point. Whatever the reason two have to be completely replaced for sure.
Laura and I devoted some time to discussing the relative merits of steps vs. bars. We both like the clean lines of the raider bar style, but they are not quite as functional. The raider bars also sit much higher, to allow for the clearance that is an important feature of anyy 4×4, but by being so high the bars do not really reduce the height one has to reach to get into vehicle that much, they are only about 4 ” down from the floor. The steps, on the other hand, are lower to the ground when folded down so divide the stepping distance more evenly and fold up when clearance is needed. The Land Rover insignia burned into the rubber step caps is another point in favour of the steps, as is price. All the people who quoted on the body work for this vehicle included the cost of reconditioned steps. Paani, the welder who I ultimately selected to do the body work said he could rejuvenate them for 50 cedis ($33) each, about half the cost of importing new ones. Stock copies of the steps without the Land Rover insignia on the rubber are available from suppliers for about $60 each, the raider bars can be imported for between $300 and $500 for a vehicle set, including shipping, depending on the model chosen. Another body work quote I got said 60 cedis each for the steps. What the bars lack is the distinctive quaintness of the steps. They fold up, for heaven’s sake, each with its own (not-so) little spring Very low tech, they epitomize English practical functionality, like the long metal vents under the front windshield that that one opens and closes by means of a big lever under the dash to gain air flow directly into the cabin.
Jonathon and Francis consulting on stepsPoor quality picture showing poor condition of steps
When Francis was over one Sunday day we were debating the pros and cons of steps vs. bars. I think he likes bars better, but he accepted our preference for the authenticity of the steps. He asked if he could take one to a welder he knew to see if he could do something with it. I gave him the most twisted one and he brought it back a week later in like-new condition. The step plate and been replaced, the frame had been straightened, the swing hinge had been rejuvenated and it had been repainted. It looked good, and it worked. Francis said if I liked it he could have the others done for a price that was lower than either of the quotes I had gotten from others. I seized on that option. I was able to reinstall them myself, with the exception of one because I seem to have lost one of the horizontal supports that runs between the bottom back of the step to the chassis.
So we now have four like-new steps. The one on the driver’s side is in the best shape, it only needed clean up and painting and that was done by the paint shop as part of their package. Indeed, I never removed that step from the vehicle.The steps were sitting around for a long time and I only just reinstalled them, along with the recovered rear seats (separate post coming) over the Christmas holiday so we could use the Defender for some Christmas social calls in Accra and Laura, and our daughter Kat and her boyfried Allan, who were visiting, could get in and not have to sit on the floor.
Driver’s Side rejuvenated steps, one still waiting for a rubber cap
The steps fold to gain about two inches additional clearance. Is that cool or what?
Three of the four steps are still waiting for rubber caps. I have one that is restorable. Through a Land Rover on-line forum I found someone in England who has caps and is willing to sell them, we are just working out shipping options. If that does not work out we may find ourselves making some from rubber scraps. (P.S. 4 years elapsed before I finally obtained the rubber caps for the 3 steps that needed them; I picked them up at Rovers North in Vermont after I returned to Canada)